MailChimp Sync is a pretty straightforward to configure in TourTools; all the essential settings are located in System Settings. But before getting into the TourTools part, some initial work must be accomplished on the MailChimp website.
TourTools Features:
Here is a list of features currently available in the system and also the ones that are available for release per requests:
Available:
- Download all available audiences back into TourTools
- Create TourTools clients in MailChimp
- Update TourTools clients into MailChimp
- Download member’s stats from MailChimp into TourTools
- Download member’s subscription status from MailChimp into TourTools
Available for release, not in TourTools yet:
- Create & Manage Campaigns from TourTools
- Create & Manage Audiences from TourTools
- Update Audience’s Members from TourTools
- Follow Campaigns Stats
- Create, Update, & Delete Templates
- Create, Update, & Delete Schedules
Initial Setup:
The first step is to go configure an API Key on Mailchimp following this tutorial provided by them:
About API Keys | MailChimp API Keys | Mailchimp
TourTools Settings:

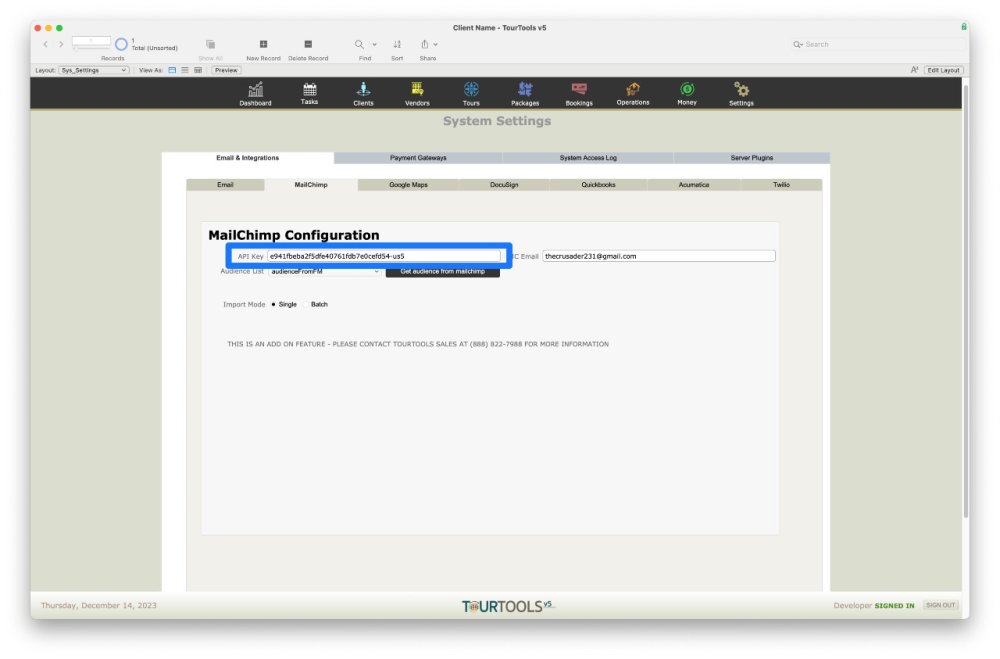
Once everything has been successfully done – you can input the API Key and the email address linked to the account onto TourTools settings and click the “Get
Audience from MailChimp” button.
The field Audience List will populate with a list of the available audience on your account; the audience you select will be used to upload new contacts from TourTools into your Mailchimp account later. Choosing one for the rest of the system to work effectively is essential.
Client List:

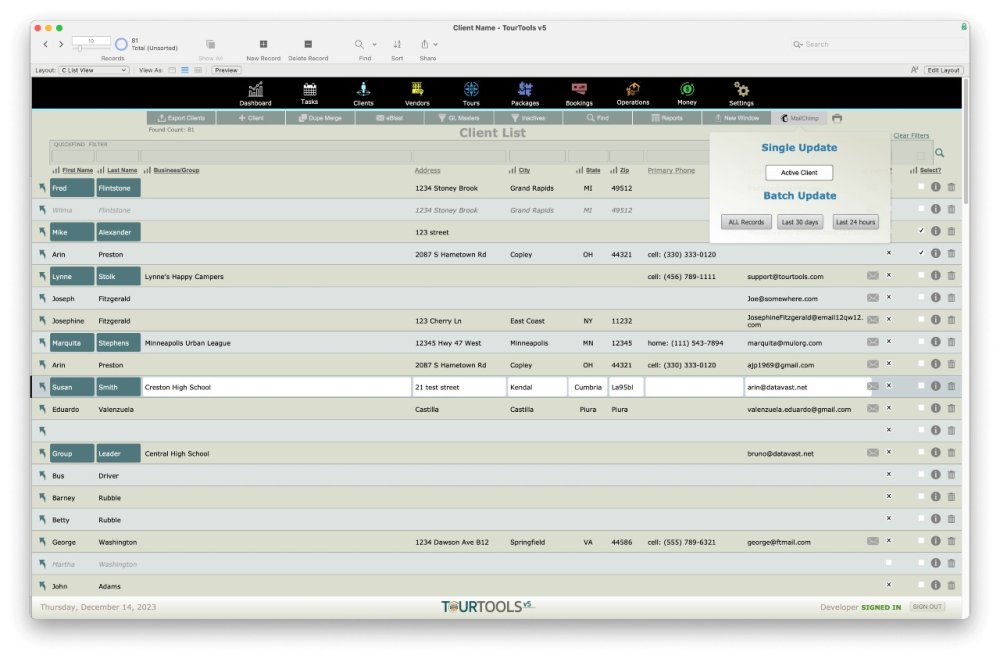
In the client module list view, a MailChimp menu will appear if the API key is populated in the settings on the upper right corner of the layout.
In this menu, you will find the following options:
- Single Update: The single update will upload or update the currently selected record information into MailChimp.
- Batch Update: All Records: This button will take the entire found set and update their information into MailChimp.
- Batch Update: Last 30 Days:* This button will only select the records that were modified or created in the last 30 days and update their information in MailChimp
- *Batch Update: Last 24 Hours : *This button will only select the records that were modified or created in the last 24 hours and update their information in MailChimp
All of the update sequences will also create new contacts in MailChimp if they don’t exist already; this script is used to handle both requests automatically.
Client Details:
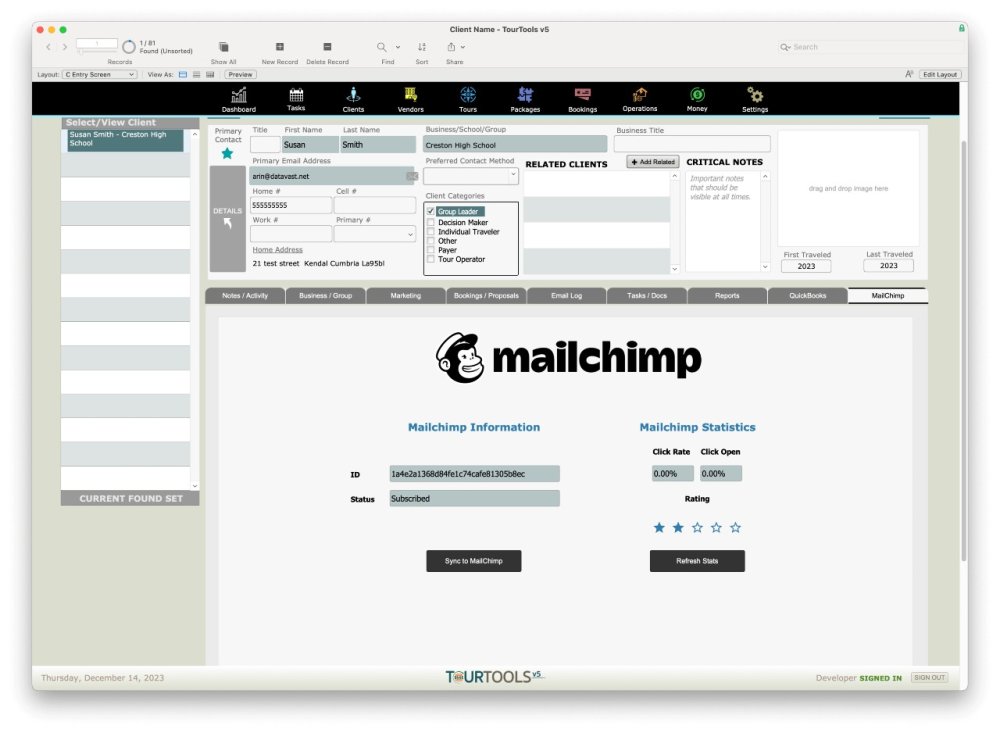
In the client details, if an API key has been entered in Settings, MailChimp will be available for the user to use. This is a pretty straightforward layout; it offers the user two options ;
- Sync to MailChimp: This button does the same thing that the update button does in the list view for the Client being browsed – it either creates or updates the information in MailChimp and also gathers the subscription status of the member.
- *Refresh Stats: *The refresh stats buttons will automatically update the list of available audiences in the system and download the stats for the Client being browsed from MailChimp; the stats will be displayed as a %.

This will display the global average Click Rate, Open Rate, and general Rating of the Client combined for all audiences directly from MailChimp.
Server Sequence & Automation:
For clients that would like their statistics & updates to be fully integrated automatically, we have designed two scripts that any developer can program on the server to run the sequence.
- *onServerMailchimp ( client_client): *This script will go through all Client records with a MailChimp ID and gather their stats automatically – this is quite the script, so it’s important not to run it locally on FileMaker Pro – since it can freeze your system for several hours.
- *Batch Upsert To MailChimp: *This script can be run with all the parameters and will run and update/sync all Contacts available on MailChimp.
MailChimp Sync Video
Benefits of Integration:
- Connect your MailChimp audiences to TourTools.
- Easily populate a MailChimp audience with your TourTools clients.
- Update MailChimp client information in TourTools.
- View and refresh MailChimp client statistics and subscription status in TourTools.
- Leverage MailChimp’s functionalities for targeted marketing campaigns based on client details.
Setting Up the Integration:
- Go to “System Settings” in TourTools.
- Find the “MailChimp” tab and enter your MailChimp API key and administrator email address. (Instructions for generating an API key are provided in the video).
- Select the desired MailChimp audience for your TourTools clients.
Synchronizing Clients:
- Synchronize all clients or clients that have been added or changed in a specified time period (e.g., last 30 days or last 24 hours) from the Client list view using the MailChimp submenu.
- Synchronize individual clients from their Client record under the “MailChimp” tab.
Important Notes:
- Maintain client data consistency by making changes in TourTools and syncing with MailChimp.
- The exception is email address changes, which need to be updated in MailChimp first, then in TourTools to maintain the client connection between TourTools and MailChimp.
- Subscription status cannot be edited in TourTools; it updates automatically from MailChimp.
For detailed instructions and troubleshooting, refer to the video or contact TourTools support.
If you have any questions that are not answered here Contact TourTools Support for assistance.


Post your comment on this topic.