This section of the User Guide is still undergoing updates. Thanks for your patience!
Making a Group Leader Booking
So far, what we’ve covered is the process for making a reservation for individuals who are booking direct and paying their own expenses. In situations where you have a sponsoring organization or another reseller acting as an intermediary, you will set up what is referred to as a Group Leader booking record. GL records can be used in situations where you never actually receive the names of the travelers— perhaps for a day trip—and it will suffice to simply invoice for “x” number of travelers; or, for instances where you receive nothing more than the names of the travelers, for whom there’s no need to create an individual Client record, and a summary invoice is desired.
The process of creating the Group Leader record begins exactly the same as for an individual, i.e., start in the Client record— which must be identified as a Master —and click on the “+ Booking” button.
Once in the new Booking record, select the tour code and skip over the “#Travelers” and “Type of Room” fields. Select “GL” as the “Type of Booking” and “Type of Invoice” and then “Continue”.
On the next screen, no pax name is entered in the record. This type of Booking can be thought of as a “holding account” or a “shell record”.
Creating a GL “Pro-Forma” Invoice
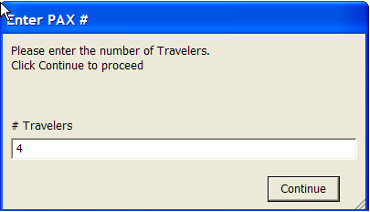
If you want to put a hold on space and be able to create a preliminary “pro-forma” invoice and/or if you anticipate never actually receiving or loading individual names, click on the “Book” button that follows the Package description, just as you do when making an individual booking. What you will then see is a screen that looks like this, prompting you to enter the number of persons who are expected to travel on that basis. In this example, we clicked on “Double” as the package type and are projecting that 4 persons will travel on a double occupancy basis. After entering the number, click “Continue”. 
This process can be repeated for as many packages as you have available and wish to sell and set up for invoicing. By example, if on this tour we needed to also invoice for 9 persons in a triple and 12 in a quad, we would repeat the process of selling twice more. When you finish, the Prices tab will reflect the sale of 4 Doubles, 9Triples, etc., and the “Group Leader Invoice”, that can be run from the Reports menu, will detail these charges.
If, as promotion of the trip moves along, there are changes in the numbers of passengers expected to travel, you can return to the Prices screen and click on the number currently confirmed for a given Package. The same window as shown earlier will open, and you can simply overtype the numbers.
If the record created in the early stages was to hold seats and allow creation of a pro-forma invoice, and you now have actual names of the travelers, come to the Prices screen, and delete the number of Package(s) sold. What you are doing is, in essence, releasing seats back into inventory in order that you can scoop them back up in the name of “real” travelers.
The process described next is used when you’ve been given the traveler’s names by the group leader and are ready to book them.
Begin by creating a GL/GL record as just described but move past the Prices tab without selling any Packages. Instead, complete the record, return to the GL booking, go to the Group / Agency tab, and click on the “+ Make Another Booking for This Client or Group” button.
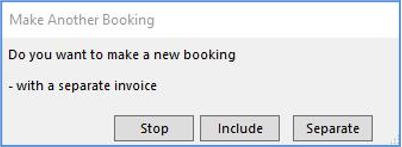
You will immediately be asked if you want to “Include” or “Separate” charges for this booking on/from the GL/GL record. Nine times out of ten, you will “include”, meaning all charges will be swept to the GL record, which is usually appropriate. The rare exception is addressed on the next page (notice the asterisk that appears toward the bottom).
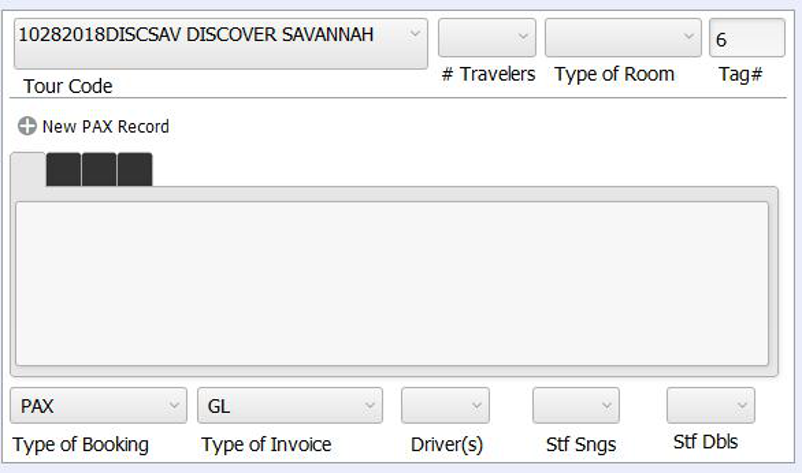
The screen that you see next is a compilation of the main Entry screen and the Prices layout. Enter the #Travelers and Type of Room, then click on the “+New PAX Record” to enter the name(s) of the travelers. You’ll see that the Type of Booking has

been identified as “Pax” and the Type of Invoice “GL”; values you will not change. After entering names in the record, proceed to the selling of a Package or Packages below. When you are finished, click on “Another” to continue adding passengers, or on “Done” once you have entered all of your group names.
The individual Booking records thus created will reflect Package sales on the Prices tab but appear to have no corresponding balance due. What is happening is, the cumulative total of all charges for all (*) bookings is being swept to the GL/GL holding record. This includes the cost of all Packages plus any “Options” sold on the Group Booking tab.
Some things to remember about Group Leader holding accounts:
If the group leader is actually traveling, it is recommended that the first Booking you make from the GL holding account be theirs. Remember that the holding account—the GL/GL record— is just that; it is not a reservation record for any individual.
Unless your group is being billed outright for a tour manager and driver, reservations for those personnel will be PAX/PAX made direct, in other words, not via the GL holding account.
All financial transactions+—including the posting of income and the payment of refunds or commissions—+must be made in the GL holding account (*) Nothing of this nature should be posted to the individual booking records. Even if checks are received directly from a traveler to pay for an individual service—an airline ticket or some optional expense, by example—if they are booked as Pax/GL, the payment still gets posted to the GL record. In such a case, the “Transaction Notes” field would ideally reference the payee.
As a reminder…If you generated a pro-forma invoice and then receive actual names from your group leader, remember to go to the Prices tab in the GL record and delete the preliminary sales you made before entering the names as actual sales. This will prevent your creating your own overbooking situation.

At the point you begin the process to “Make Another Booking for This Client or Group”, you are asked if you want to Include or Separate the charges from the GL Invoice. If you have a situation where an individual traveling with the group is going to make their own payments on account, indicate that you want to separate them out. When you do, the invoice will still be addressed to their Group Leader, but the document will be completely separate from the GL Invoice.
Canceling or Rebooking an Entire Booking Record

Canceling One Passenger in a Record
To the right of each Pax name listed on the front page of a Booking record, there is a small trash can. Use that when one of the passengers represented in a multi-traveler booking needs to be canceled. When doing so, keep an eye on related data in the record; by example, has the number of travelers reduced from 2 to 1? Should the Package confirmed no longer be “Double” but need to be adjusted to “Single”? To be sure, not all of those changes will happen automatically.


Insurance
The sale of insurance can be automated (consider customization) in TourTools™, and throughout the system you will see fields and layouts that reference coverage. The specifics of what you sell and how you sell it will need to be programmed, and separate instructions for managing your program will be provided upon completion.
Reports Menu
Since there are so many reports and documents available in the Bookings database, they are divided over five different tabs, as follows:
Doc Queue Tab
On the left-hand side of the layout, there are buttons representing the various documents that you send to your travelers. These may include confirmations, receipts or invoices; or may be forms that need to be completed and returned to you.
A single click on a button will send the document in question to the document queue on the right. If you wish, all documents queued up can be run at the same time by clicking on the “Print Queue” button (any you want held back temporarily can be marked “Hold”, which will prevent their printing). If preferred, single documents can be run by clicking on the “Print” button preceding the document’s “name”. If the Client record to which the Booking is linked has an e-mail address, the document can be e-mailed, or it can be printed to paper; you will be given the choice when you click on the “Print” button.
If you are going to run a batch of documents from the queue, be sure to click in the box labeled “Paper” for any registrants who have e-mail but don’t want to receive their documents electronically. The process is completely automated, meaning the e-mail/paper choice will not be presented for each individual record.
As soon as the document is sent, the Print Date will auto fill, and the button labeled “Printed” will highlight. If there is a need to re-print, de-select the button by clicking on it and the document will go back into the queue, and/or can be manually reprinted or emailed.
If you have documents that need to be tracked—in other words, they need to be returned to you by the traveler (liability release forms is a good example)—click the “Trak” field before you print it.. Once the form is returned, record the date on which that happened in the Recd Date field on the Doc Tracking tab.
Click on the trash can icon to remove a document from the queue.
The other buttons in this area include the “Queue Report” which will generate a report showing everything that is in the queue; and the “Clear Document Queue” button which will clear the queue completely of any documents that have yet to be printed. Click in the field Chose Type for Preview to select the document you want to look at, then click the “Preview Document” button to view it.
Correspondence Tab
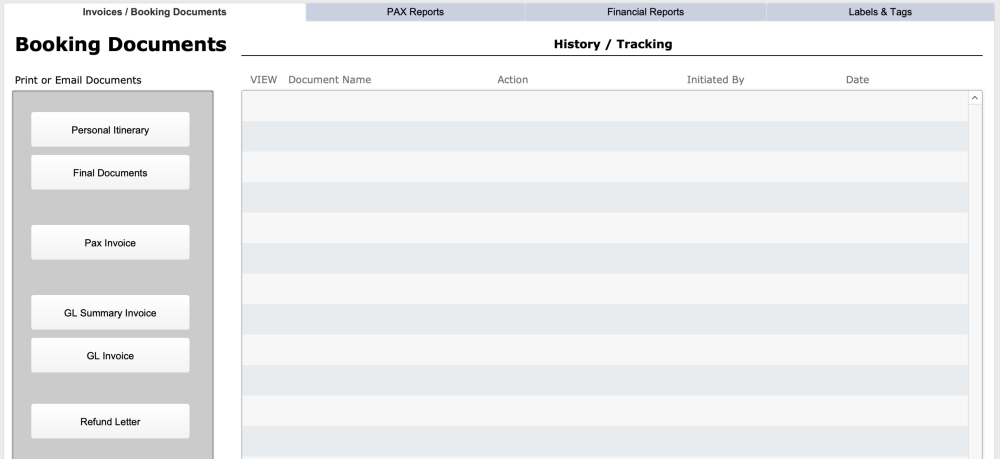
Group Leader Invoice: This is the invoice you will send to your group leader. The individual travelers linked to the GL/GL record are listed on the form, as are all charges and payments that have been swept to the GL account. If you prefer to send a summary of charges without all of the detail, run the GL Summary Invoice from the Doc Queue tab.
Unstored Fax/Unstored Letter: Use as a means to send a quick note or fax to one traveler or all passengers on a given tour. As the name implies, these are not permanently stored anywhere in the system; each time the form is used, you overwrite the text that was entered the last time.
Pax Reports Tab:
Rooming List: A list of all passengers confirmed on the tour, sorted on the tag number. Be aware there is another roomlist that can be generated from Ops, which is Vendor specific.
Rooming List Internal: Same as above but including some additional information about the travelers that might be helpful to the tour manager.
Ticket List: If your system has the “Ticket Module”, this report lists who is assigned what tickets.
Passenger Address List: Lists the names of all passengers on the tour, along with their addresses.
Cruise Dining List: This report displays the dining preference and dining notes loaded on the main entry screen in the Booking record. Dietary preferences loaded in the Client record are also referenced.
Passenger List: A list of travelers by name, also showing their Booking numbers.
Passport Report: This report displays the passport details, birth date and other information stored in Client.
Pax Meal Report: Information regarding your traveler’s menu selections are reflected on this report.
Waitlist Report: When this report is called, you are given the choice of listing passengers waitlisted on all tours or just the tour that shares the code of the record you’re in.
Special Occasion Report: Reflects information loaded on the main entry tab, having to do with special occasions being celebrated while on tour.
Insurance Report: Will be activated if and when your system is customized to accommodate insurance sales.
Universal Manifest: Reflects names, addresses, birthdates and passport details.
Departure Bus Manifest: Use this report to see “who’s getting on where”, based on input made on the Departure screen. The $$ appearing to the left of the passenger name indicates that the traveler still owes you money.
Return Bus Manifest: This report is identical to the outbound manifest only showing the return day information.
Master Dep Manifest: A variation on a theme, this report lists passengers, their home phone numbers, and notes on where they are boarding the motorcoach.
Air Manifests: When you call this report, you are given the option of displaying data by “Pax” or by “Segment”. If you chose “Pax”, each individual traveler and their schedule will list; if you pick “Segment”, all travelers on a specific itinerary will display as a group.
Air Manifest – by PNR: This report reflects all passengers on a given tour who have flight itineraries confirmed, sorted by PNR record.
Financial Reports Tab:
Booking Totals B/O/C Status Report: This report lists passengers by tour, offering an indication of whether they are Booked, Optioned or Confirmed; also showing total charges, discounts, total paid and due, and cumulative totals.
Booking Totals Report: This is a list of tours, arranged in order of departure date, showing the number of passengers booked, total sales and total paid, as well as balance due. Cumulative totals appear at the bottom.
Balance Due: This report can be run by a specific date, date range or tour; and shows where there are balances owing.
Cash Report: This report can also be run by a specific date, date range or tour; and shows all payment activity. Even though it is called “cash” report, payments by check and credit card are also displayed.
Credit Card Report: This report is identical to the “Cash Report” as far as how it is called and what it displays; however, it displays only payments identified as “Credit Card”.
Late Payment Report: This report shows those individuals who are late with payments, comparing the payment history of the Booking to the deadlines loaded in Tour Master.
Refunds Due List: This report lists the Bookings that are due refunds, either as a result of an overpayment or because the reservation has been canceled.
Commission Due List: Commissions are considered payable as of the last day of a tour. This report can be called a single tour, all tours, or commissions due in the next 30 days. The presentation/sort is by tour.
Tour Element Inventory Report: This report (also available from Package) is usually run to determine why a Booking has waitlisted. Every element included in the Package will be reflected on the report, along with an accounting of inventory loaded, sold, still available or sold out.
Booking Status Report: This is quite a “busy” report, which reflects, by tour, an overview of each individual booking record’s pertinent detail and an accounting of financial activity. Contact information for the traveler is also captured, as are booking numbers for the tour in question.
Sales Totals by Salesperson: If the Client record to which the Booking is linked has a Salesperson associated, or if a Salesperson is assigned at the time of booking, this report captures that relationship. The Salesperson Totals report can be called by tour or by a range of tours and presents the salesperson’s production in terms of passenger numbers and revenue. Any bookings not associated with a salesperson will appear at the top of the report.
Invoice Report: This is an overview, by tour, of passenger totals, and payment totals by type.
Tour Totals w/o Financial Info: This report is similar to the Booking Totals B/O/C Report but without any financial details.
Marketing Report: This report reflects how many bookings are attributable to your Source and Segment marketing efforts (values maintained in the Marketing Support File).
Labels, Tags and Vouchers Tab:
Avery Labels/Envelope: You can print one of two varieties of labels or #10 envelopes from Bookings. Once having clicked on the icon of choice, you will be asked if you want labels for everyone on a given tour or if you want to select specific records.
Name Tag/Luggage Tag: Clicking on this button will move you to the PAX records related to the tour referenced by the record you’re in. From here, select which type of tag or label you wish to run by clicking on the appropriate icon.
If you have any questions that are not answered here Contact TourTools Support for assistance.


Post your comment on this topic.